VS Code搭建ARM Linux Makefile工程IDE(C/C++)[史上最详细]
0.环境介绍
主机:ubuntu 18.04(LTS) 开发板主控:RK3399(ARM 64bit) 或者其他任意一款只有对应的工具链即可 OS:Linux version 4.4.143 开发板IP:192.168.19.171 编译器:aarch64-linux-gnu-gcc (gcc version 7.3.0) 调试器:主机:aarch64-linux-gnu-gdb (gcc version 7.3.0) 开发板:gdbserver(7.3.0) VS Code版本 版本 1.23.1 提交 d0182c3417d225529c6d5ad24b7572815d0de9ac 日期 2018-05-10T16:04:33.747Z Shell 1.7.12 渲染器 58.0.3029.110 Node 7.9.0 架构 x64 VS Code插件:C/C++ (在扩展里面添加即可)
1.简单的C/C++ Makefile工程
1.1 整体工程预览
.
├── add.c
├── makefile
├── sub.c
└── test.h
1.2 add.c
#include "test.h"
#include <stdio.h>

int add(int a, int b)
{
    return a + b;
}

int main()
{
    printf(" 2 + 3 = %d\n", add(2, 3));
    printf(" 2 - 3 = %d\n", sub(2, 3));
    return 1;
}
1.3 sub.c
#include "test.h"

int sub(int a, int b)
{
    return a - b;
}
1.4 test.h
#ifndef _TEST_H
#define _TEST_H

int add(int a, int b);
int sub(int a, int b);
#endif
1.5 makefile
#板子对应的交叉链,可以换成其他对应的版本即可
CC=aarch64-linux-gnu-gcc

test: add.o sub.o
    $(CC) -o test add.o sub.o

add.o: add.c test.h
    $(CC) -c add.c

sub.o: sub.c test.h
    $(CC) -c sub.c

clean:
    rm -rf test
    rm -rf *.o
2. VS Code开发环境搭建
VS Code的灵活性在于可以完全自定义搭建一个适合自己用的开发环境,其中包括可以自定义编译任务,调试任务。
2.1 VS Code导入工程
直接打开VS Code,再选择“打开文件夹”,打开对应工程的文件夹即可
2.2 VS Code自定义生成编译任务
如上面提到,VS Code的灵活性在于自定义编译任务,而VS Code中用于描述编译任务的定义为:tasks.json,所以自定义编译任务就是编写tasks.json。首先,编写tasks.json有以下两种方法:
1. 在View下打开命令面板(Command Pallette)(快捷键Ctrl+Shift+p),搜索Task,选择Tasks:Configure Task,之后选择Others,生成tasks.json文件。
2. 在菜单栏上面,选择任务(T)-->配置任务(C)...-->使用模板创建tasks.json-->Others,生成tasks.json文件。
2.2.1 至简的tasks.json参考
{
    // See https://go.microsoft.com/fwlink/?LinkId=733558
    // for the documentation about the tasks.json format
    "version": "2.0.0",
    "tasks": [
        {
           "label": "shell",//任务名称,和launch.json中一致,即执行这个任务
            "type": "shell",//任务类型,即执行该任务的类型,填shell表示在命令行中执行的任务
            "command": "make",//执行命令是make,即调用makefile进行编译若直接使用gcc命令行,替换即可
            "problemMatcher": [
                "$gcc"
            ],
            "group": {
                "kind": "build",
                "isDefault": true
            }
        }
    ]
}
2.2.2 添加出错信息的tasks.json参考
{
    // See https://go.microsoft.com/fwlink/?LinkId=733558
    // for the documentation about the tasks.json format
    "version": "2.0.0",
    "tasks": [
        {
            "label": "shell",
            "type": "shell",
            "command": "make",
                //这个字段是发生错误时,信息的匹配
            "problemMatcher": {
                "owner": "cpp",
                "fileLocation": [
                    "relative",
                    "${workspaceFolder}"
                ],
                "pattern": [
                    {
                        "regexp": "^([^\\s].*)$",
                        "file": 1
                    },
                    {
                        "regexp": "^\\s+(\\d+):(\\d+)\\s+(error|warning|info)\\s+(.*)\\s\\s+(.*)$",
                        "line": 1,
                        "column": 2,
                        "severity": 3,
                        "message": 4,
                        "code": 5,
                        "loop": true
                    }
                ]
            },
            "group": {
                "kind": "build",
                "isDefault": true
            }
        }
    ]
}
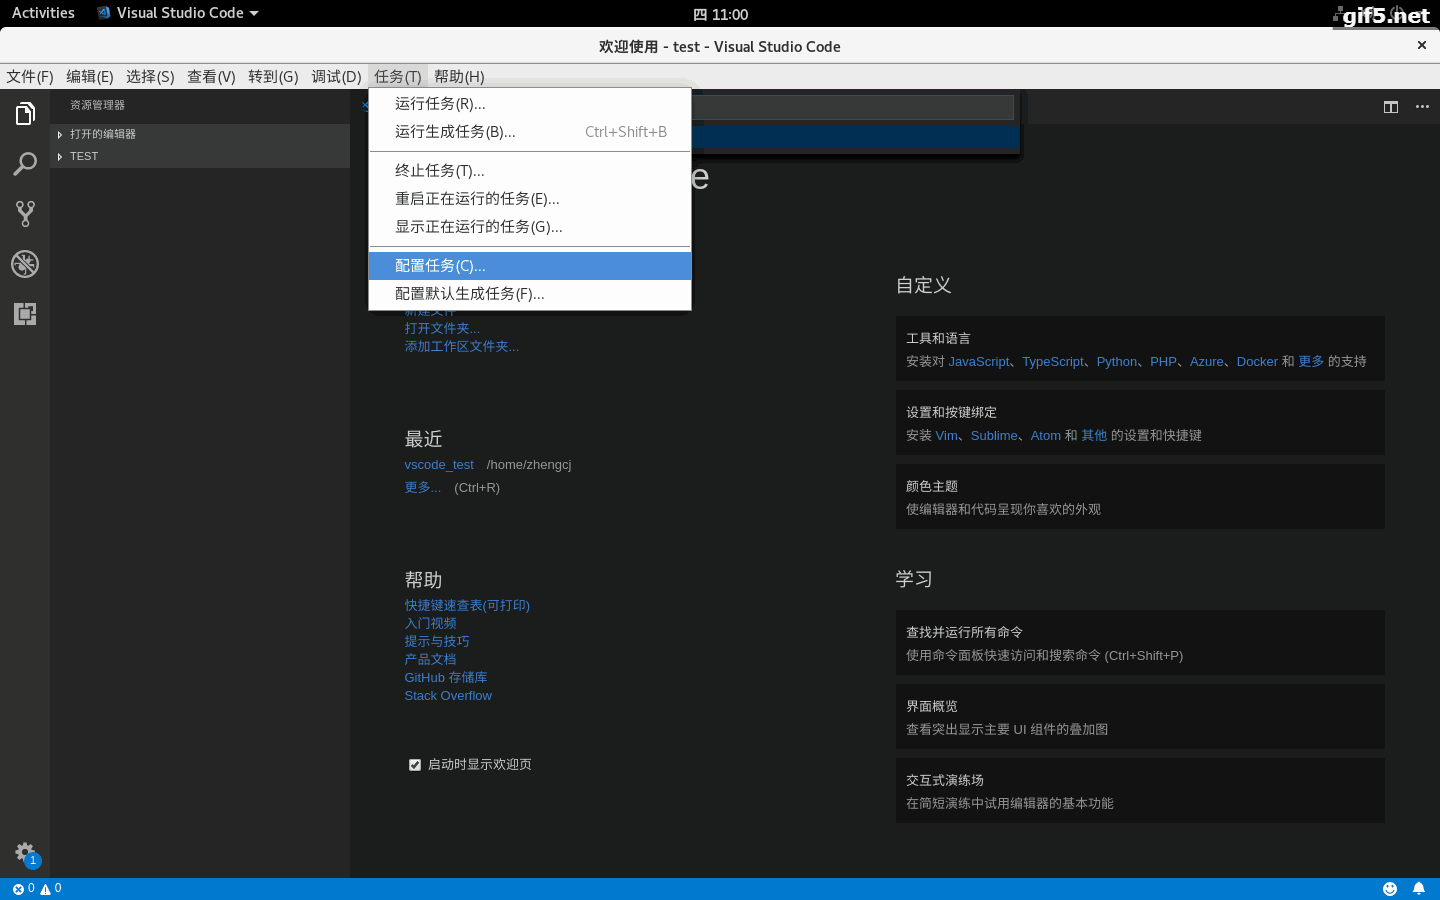
2.2 VS Code自定义生成调试任务
如上面提到,VS Code的灵活性在于自定义调试任务,而VS Code中用于描述调试任务的定义为:launch.json,所以自定义编译任务就是编写launch.json。首先,编写launch.json可以参考以下方法:
在菜单栏上面,选择调试(D)-->打开配置(C)...-->C++(GDB/LLDB),生成launch.json文件。
2.2.1 生成的launch.json
系统自动生成的模块如下:
{
    // 使用 IntelliSense 了解相关属性。
    // 悬停以查看现有属性的描述。
    // 欲了解更多信息,请访问: https://go.microsoft.com/fwlink/?linkid=830387
    "version": "0.2.0",
    "configurations": [
        {
            "name": "(gdb) Launch",
            "type": "cppdbg",
            "request": "launch",
            "program": "enter program name, for example ${workspaceFolder}/a.out",
            "args": [],
            "stopAtEntry": false,
            "cwd": "${workspaceFolder}",
            "environment": [],
            "externalConsole": true,
            "MIMode": "gdb",
            "setupCommands": [
                {
                    "description": "Enable pretty-printing for gdb",
                    "text": "-enable-pretty-printing",
                    "ignoreFailures": true
                }
            ]
        }
    ]
}
2.2.2 launch.json重要项修改添加
可以看到VS Code帮我们生成的文件里面已经完成大部分工作,只需添加修改相应的必要项即可:
- 修改可执行文件的位置:
"program": "enter program name, for example ${workspaceFolder}/a.out",修改成我们make编译完成的二进制文件,如本次示例中的"program": "${workspaceFolder}/test", - 修改所用gdb调试器所在的位置,添加选项:
"miDebuggerPath":"/usr/bin/aarch64-linux-gnu-gdb",建议最好使用绝对路径,如本例所示 - 修改目标开发板的IP和端口,添加选项:
"miDebuggerServerAddress": "192.168.19.171:10000",如本例所示 - 其他修改:
"preLaunchTask":"shell",与之前tasks.json中的任务名称要一致,表示在调试前执行的前置任务,当然,除了执行make,还可以执行其他系统命令,如将编译生成文件复制到目标开发板上等等。。。
2.2.3 launch.json参考
{
    // 使用 IntelliSense 了解相关属性。
    // 悬停以查看现有属性的描述。
    // 欲了解更多信息,请访问: https://go.microsoft.com/fwlink/?linkid=830387
    "version": "0.2.0",
    "configurations": [

        {
            "name": "(gdb) Launch",
            "type": "cppdbg",
            "request": "launch",
            "program": "${workspaceFolder}/test",
            "args": [],
            "stopAtEntry": true,
            "cwd": "${workspaceFolder}",
            "environment": [],
            "externalConsole": true,
            "MIMode": "gdb",
            "miDebuggerPath":"/usr/bin/aarch64-linux-gnu-gdb",
            "miDebuggerServerAddress": "192.168.19.171:10000",
            "preLaunchTask":"shell",
            "setupCommands": [
                {
                    "description": "Enable pretty-printing for gdb",
                    "text": "-enable-pretty-printing",
                    "ignoreFailures": true
                }
            ]
        }
    ]
}
3. 编译&调试
3. 1 调试前的准备
为了使开发主机上的生成的可执行文件可以复制到目标开发板上,可以通过网络的形式进行传输,毕竟GDB也是基于网络的,这样就更方便些,例如本文所用的方式NFS:已知在开发主机上已经有NFS服务器了,目录为 /home/dl/share/nfs,IP地址为:192.168.19.188 。那么只需要在开发板上挂载NFS服务器即可,用如下命令:
mount -t nfs -o nolock 192.168.19.188:/home/dl/share/nfs /mnt
将PC的NFS目录挂载到开发板的mnt目录 。
因此,需要每次将生成的目标文件复制到nfs目录下,有很多种方式,可以手动用命令进行,因此VS Code中已经集成了终端,可以直接用,又或者修改makefile,添加make install 之类的命令,也是可以的,方法有很多,举个简陋的例子(makefile):
install:
    cp -raf test /home/dl/share/nfs
然后,修改tasks.josn,让它执行make 之后再执行make install:
.............
 "tasks": [
        {
            "label": "shell",
            "type": "shell",
            "command": "make;make install",
.............
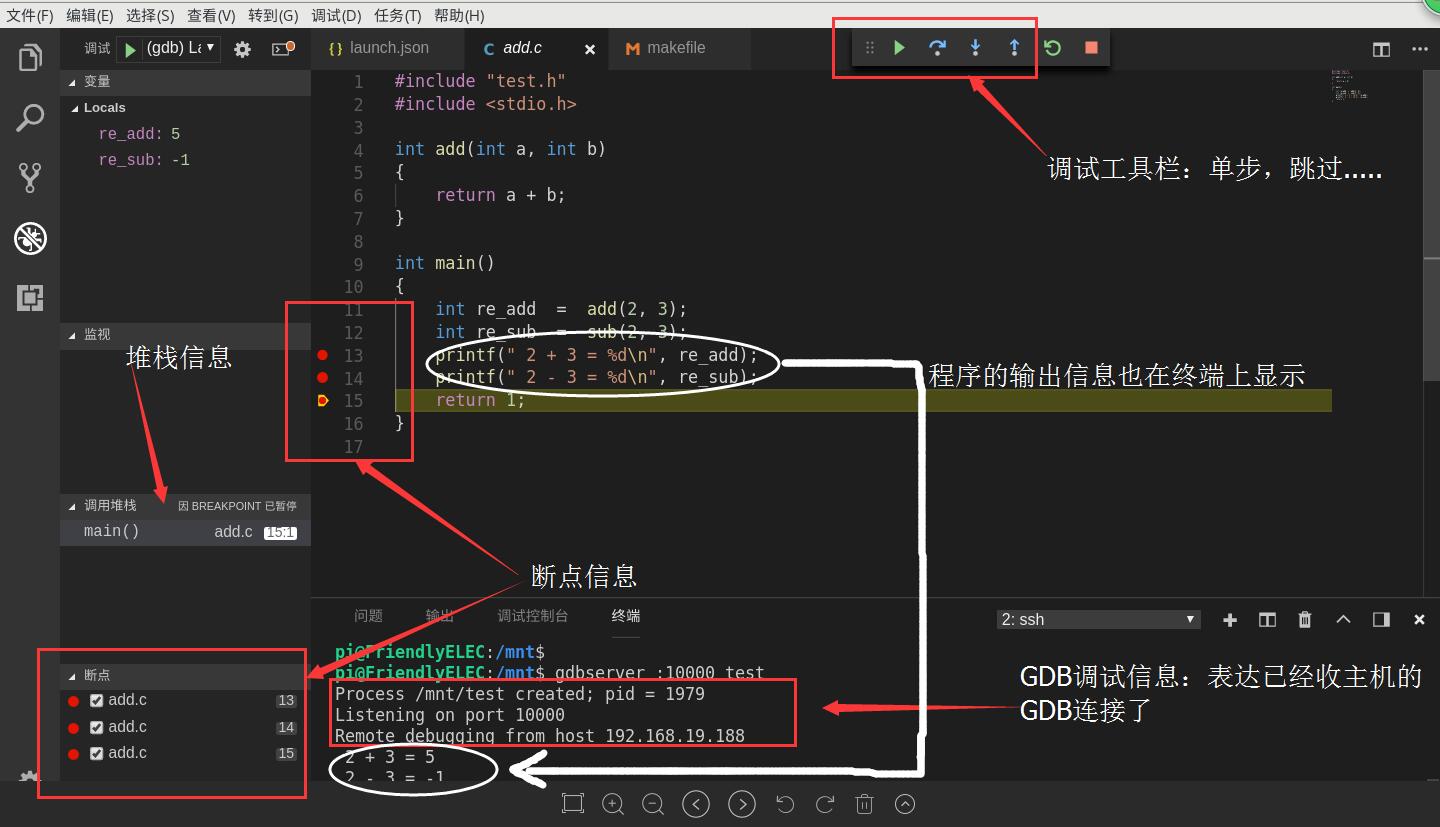
3.2 开始调试
- VS Code还有一个好处就是集成了linux sh终端,使用VS Code终端界面,在里面连开发板的SSH,就不再需要在调试的过程中不断的进行界面切换了,按上文所提开发板的IP为:192.168.19.171,因此,在VS Code中用SSH相连即可:
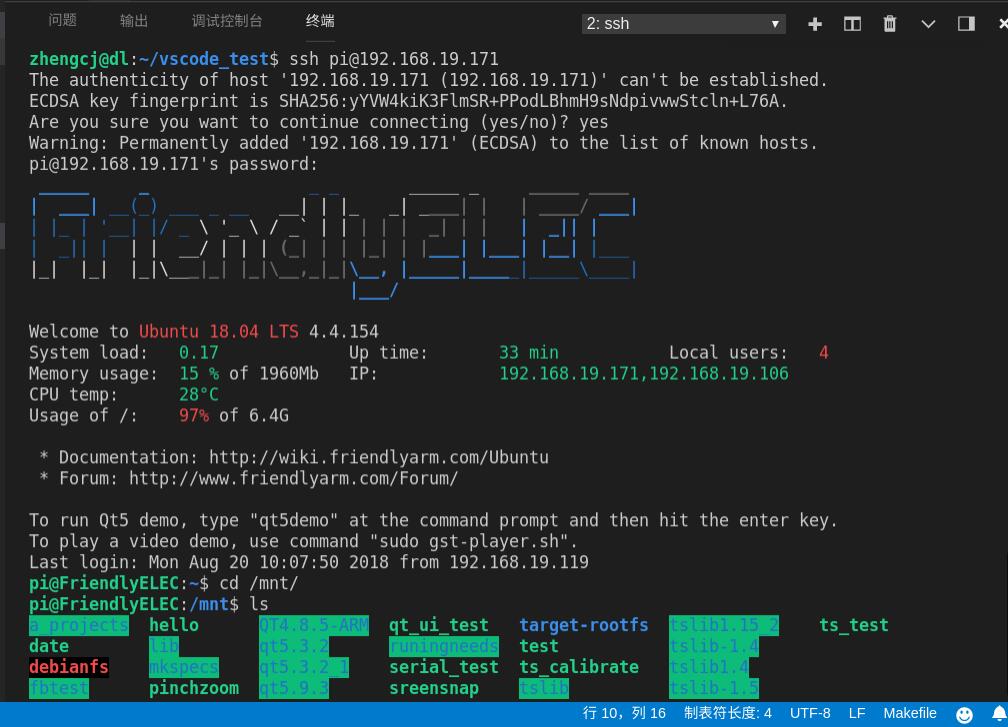
-
按前面的步骤,已经可以实现在开发板的/mnt目录下面实现数据程序的共享了,在开发板的/mnt目录下面输入命令:
gdbserver :10000 test即可实现在开发板监听10000端口的GDB调试事件了。 -
在VS Code下面按下快捷键:
Ctrl+Shift+B即可实现调用makefile对整个工程进行make 并且make install ,效果如下: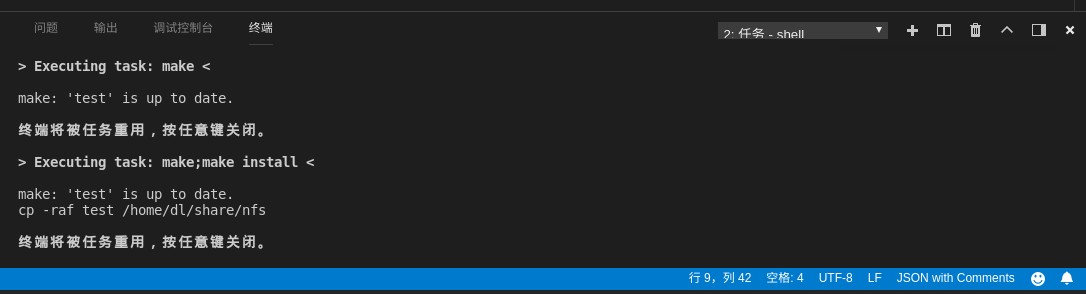
4. 演示效果